Woot! After a couple weeks of slaving away in ZBrush, I’m finally done with this one, and I am actually thrilled with how it turned out!!! There was a quick detour when I decided I liked where one particular aspect of the model turned out, so I took a couple of my 3D printers out of hibernation and put them to work. I will attach a few pictures of how that turned out on here too. But first, “Inevitable Carcinization”:
Click for full size
And here is an alternate render to fix several things I found crappy with my first attempt:
Click for full size
If you’re not sure of what carcinization is, and you have any interest at all in bizarre evolution, I’d strongly recommend looking it up. Basically, Wikipedia defines it as this:
Carcinisation (or carcinization) is an example of convergent evolution in which a crustacean evolves into a crab-like form from a non-crab-like form. The term was introduced into evolutionary biology by L. A. Borradaile, who described it as “one of the many attempts of Nature to evolve a crab”.
This whole thing started as a skull study in ZBrush. I own several human skulls, which yes, I legally purchased. These provide excellent reference for not only figuring out how to draw and sculpt (skullpt?) skulls, but also give an insanely huge insight and appreciation to the underlying form of the human head. If you ever draw or paint or sculpt anything with an underlying skeletal system, I can’t recommend enough doing tons of skull studies. Anyways, I used the structures of several of my skulls as a reference to sculpt the skull model. I was going for accuracy. When I was finished modeling the skull portion, I was more than pleased with the result, and as previously mentioned, I decided to make a resin print of it and paint it up all ugly brown, before completing the illustration. Here’s how that turned out:
Click for full size
Soon after finishing the skull, I took yet another detour from the illustration and created a stand for it. I opened ZBrush and attempted to make it a stylish quasi-mannequin head type of stand. This was printed in my filament printer using PLA, as detail wasn’t so important and cleanup is 100x easier than resin. Here’s how that turned out:
Click for full size
Now back to the illustration. Everything was sculpted and painted in ZBrush, except for the sky. This model had over 19 million polygons, so it became quite burdensome and sluggish to detail, but I pushed through. I painted the sky in Rebelle, rendered the entire scene in Keyshot, and color-corrected and added noise in Affinity photo. I have gotten to where I try to do as much in ZBrush, using only the default tools, as possible. It feels like things are more cohesive the less I have to paint over them in other programs.
And that, friends, is two whole posts in one short month! Thanks for reading this far, and take care!
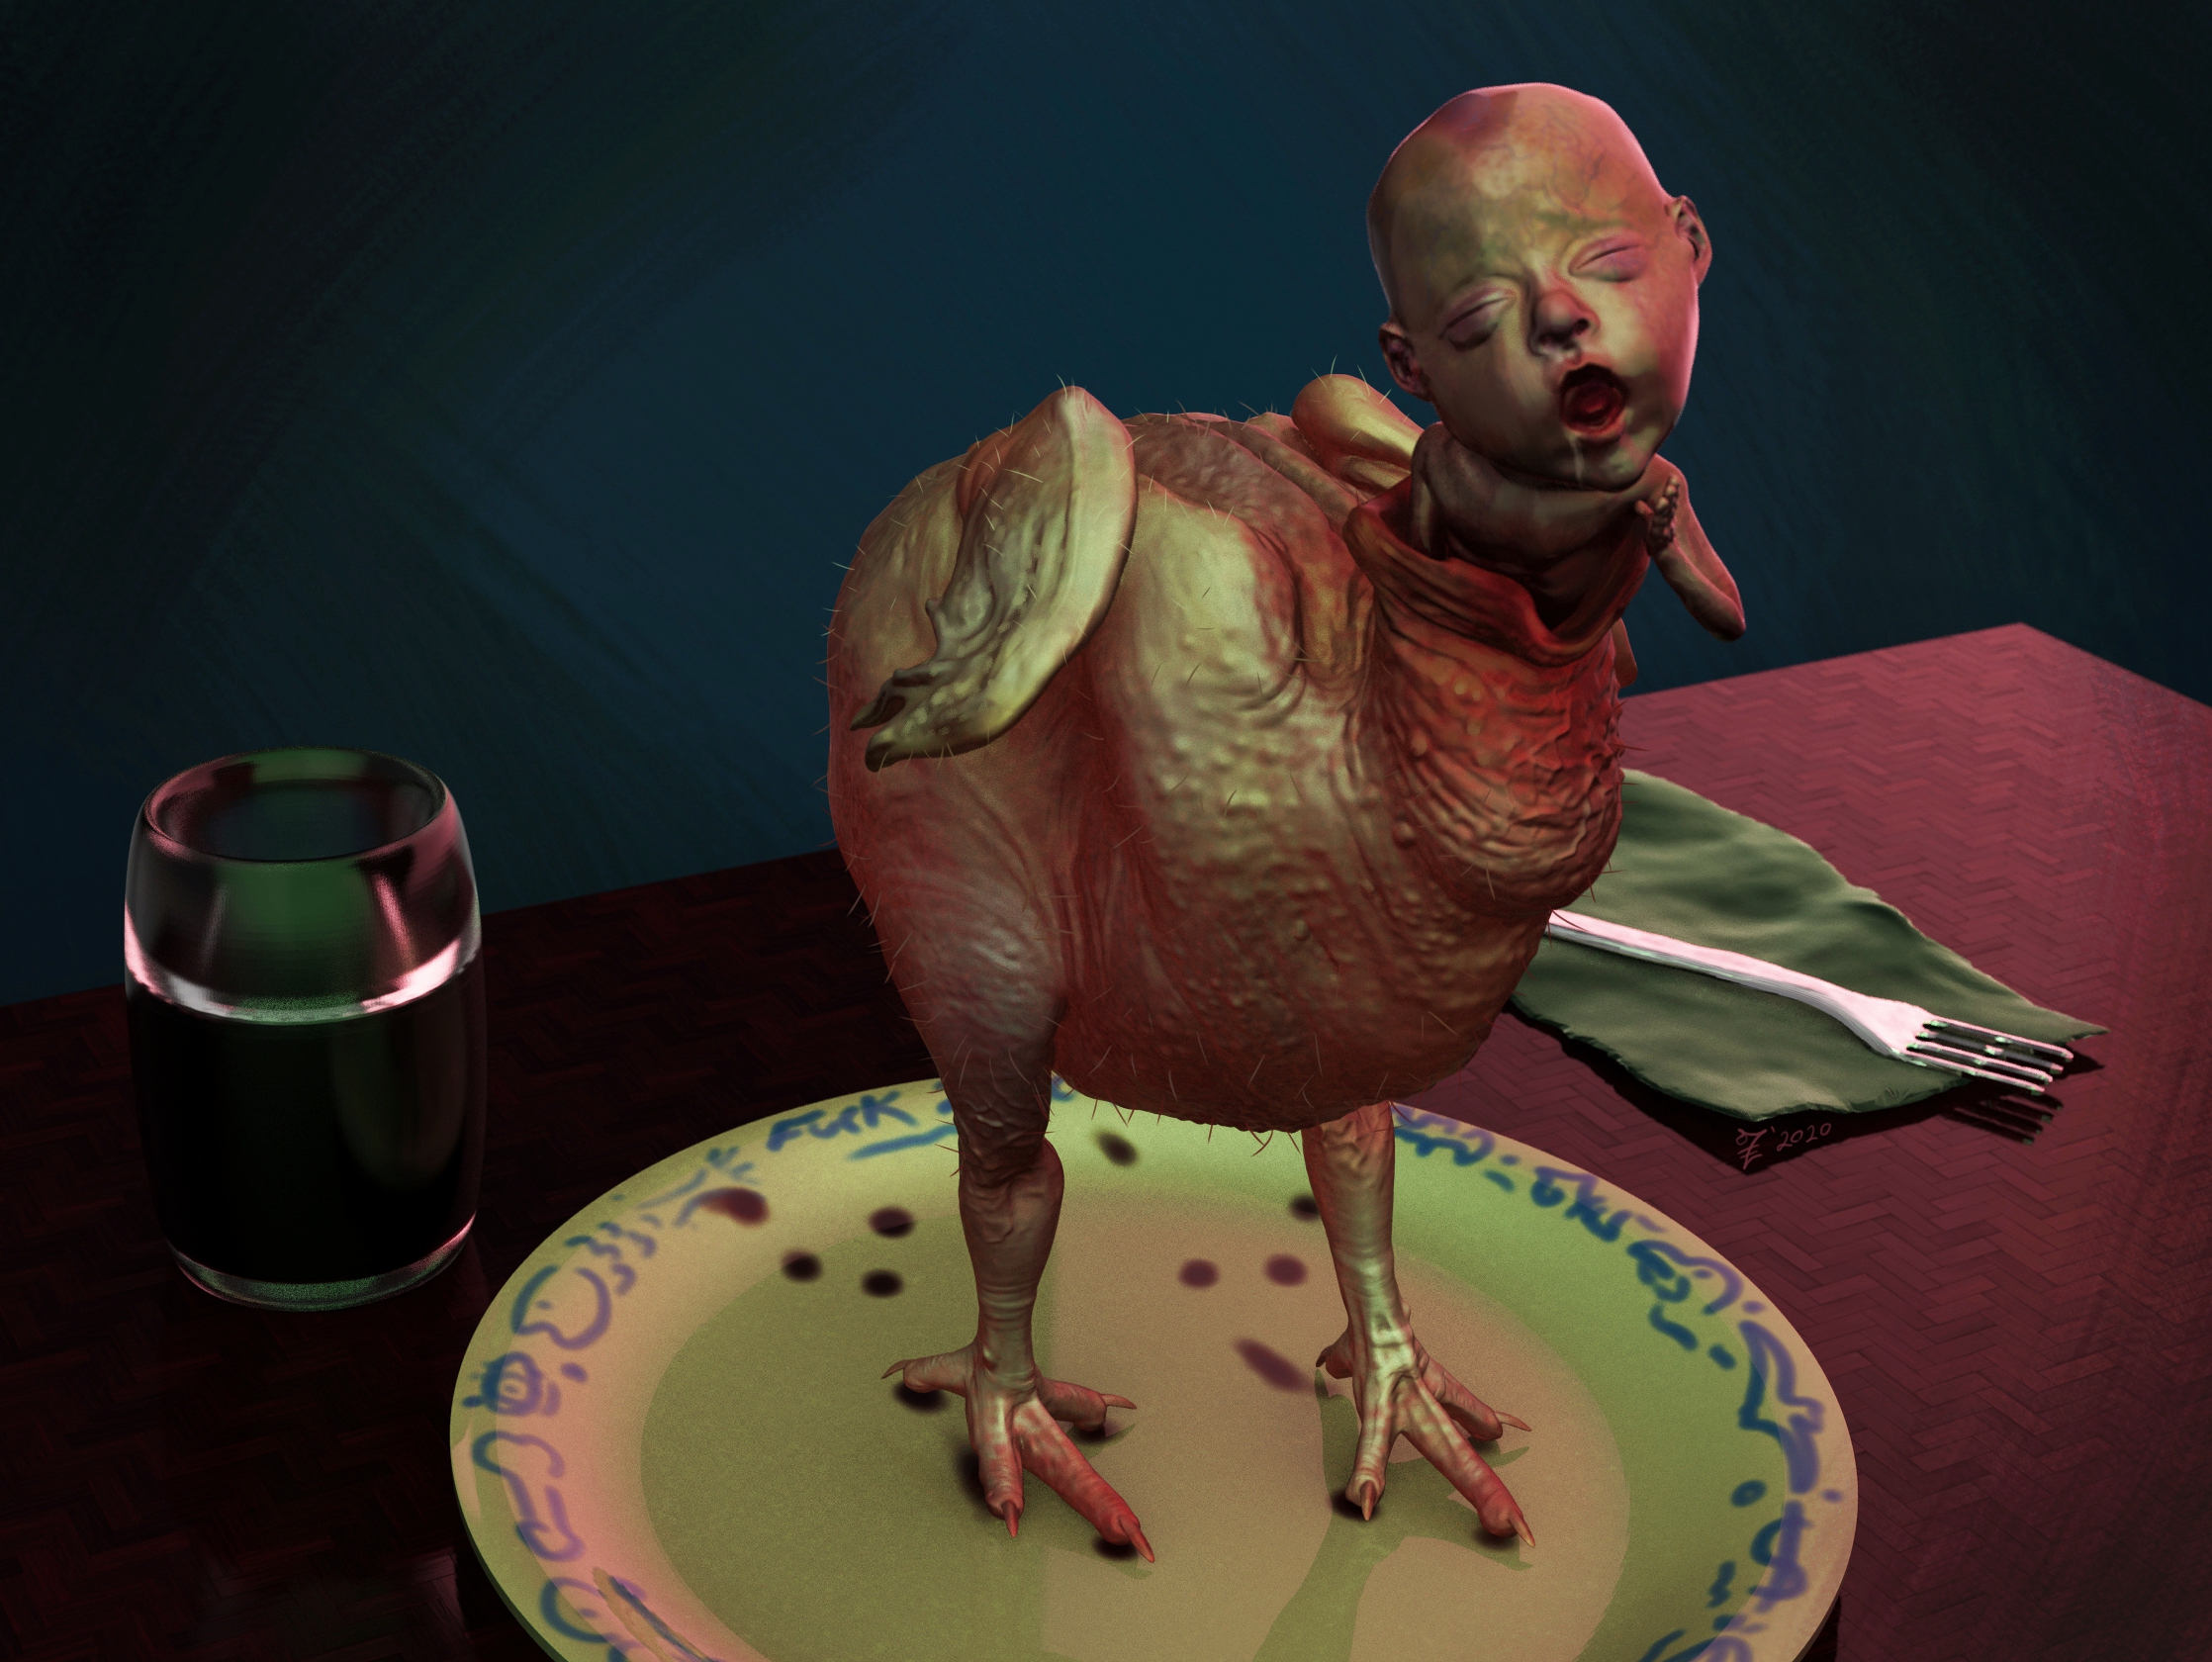
Here’s another Zbrush/Corel Painter/Blah-blah-blah thingy! With overtime at work, a girlfriend, and the weather occasionally being good enough to finally take the motorcycles out, this bastard was created over the course of about a week, mostly after work (instead of getting anything that could be considered “sufficient” sleep.) As per the recent norms, I don’t know if I like this or not; more time to detach from staring at this bastard, and a little sleep is needed. And also, as per the usual norms, this is about all you’re going to get in the way of words. I’m off to bed!!!
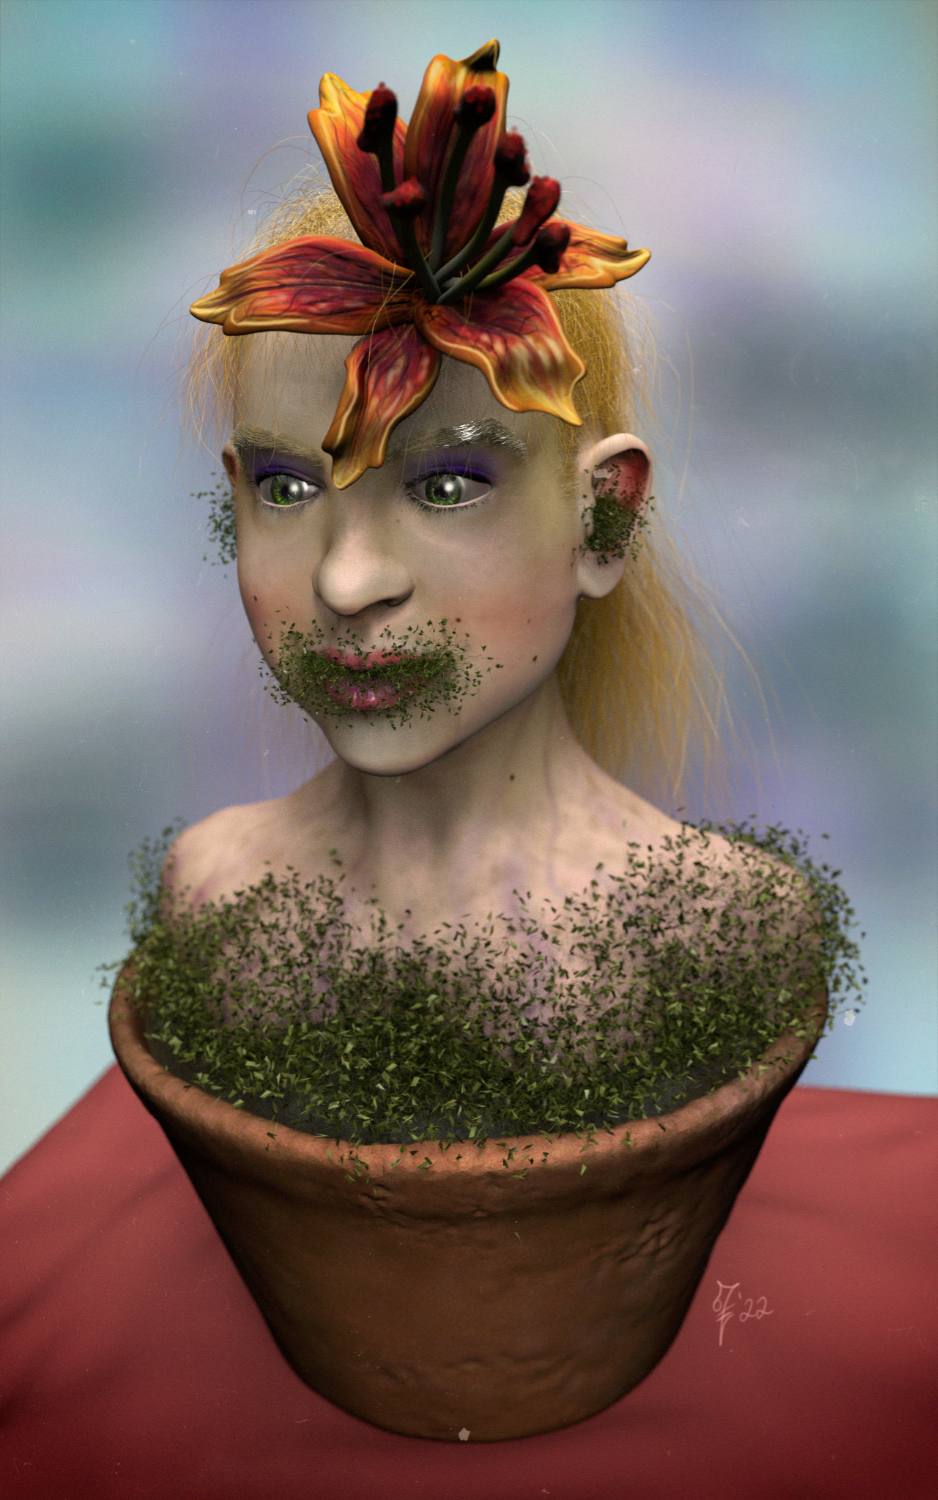
Hello! Here is one I finished this weekend while experimenting with some new (to me) features in both ZBrush and Keyshot. It is absolutely mind-blowing to me the amount of functionality each of these programs has, if you are willing to look. So that’s what I’ve been doing-looking for and dicking around with new settings and techniques-and saving my experiments as a random picture I can throw on my blog. This is what I ended up with when trying to figure out “transparent” skin while messing around with various material properties and extrusions:
Click For Full Size
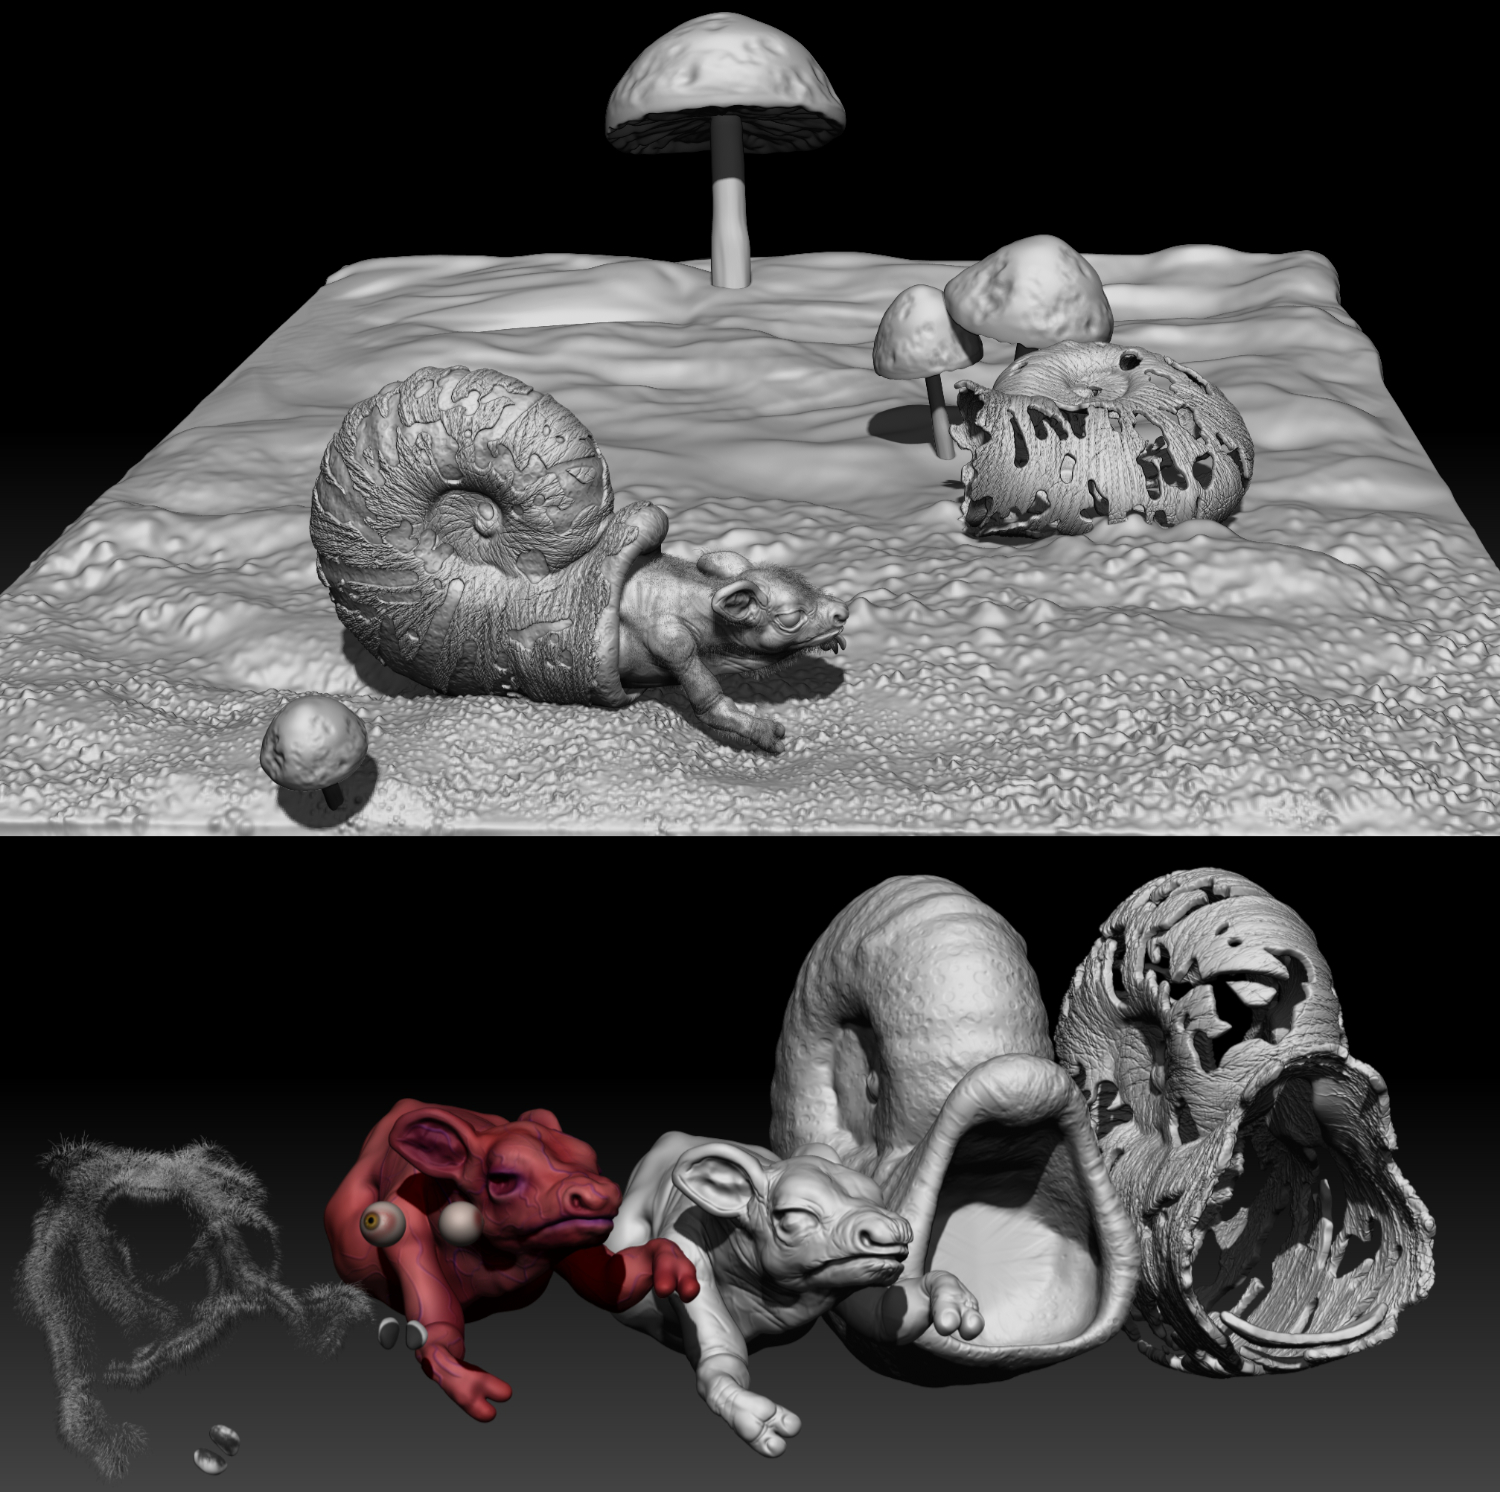
And if you are interested, here’s a really quick look at some behind-the-scenes shit showing the unpainted completed sculpt, and an example of how I have to sculpt each part separately so I can assign proper material properties (transparency, reflectivity, etc…)
Click For Full Size
I was going to write up another story for this post, but I honestly had no story for it. It just kind of happened; my brain needed to purge a snail creature and mushrooms, I guess. But don’t fret! I showed the picture to some people, and one emailed me back the story. He wanted to remain anonymous (most likely because he doesn’t want to incur David Attenborough’s wrath), so thanks mysterious stranger! He says:
I believe David Attenborough made a documentary about this animal. As I recall, its halitosis is surpassed only by its body stench, derived from living in its filth-encrusted, moldy shell, which in fact serves not only as a lavatory, but also as a restaurant and vomitorium, which emits a stench so powerful that it serves as an extremely effective deterrent against predators which typically expire if caught within a 6-foot radius of the animal. Its smell doubles as a sort of narcotic that overpowers its prey, leaving all small creatures helpless and easily captured in its toothless jaws. In fact, the only organisms that aren’t immediately killed in its presence are fungi, such as mushrooms, yeasts and molds, as well as viruses and bacteria. Significantly, the animal has somehow become immune to the ill effects that those organisms tend to inflict. Recognizing the clinical implications of understanding this form of symbiosis, immunologists are now preparing to undergo studies to see if this immunity to viral, bacterial and fungal infections can be induced in humans. Thus, what might appear to be a rather unpleasant organism might one day prove to be Mankind’s salvation. The hope is that if humans can tolerate wallowing in their own feces, urine, vomit, and other bodily secretions, they may avoid diseases and live longer lives. To help with this worthwhile cause, interested volunteers are urged to come forward to participate in a six-month study. A tent has been set up behind the WalMart. Qualifying applicants will be asked to sign a waiver. We are working on a compensation package.
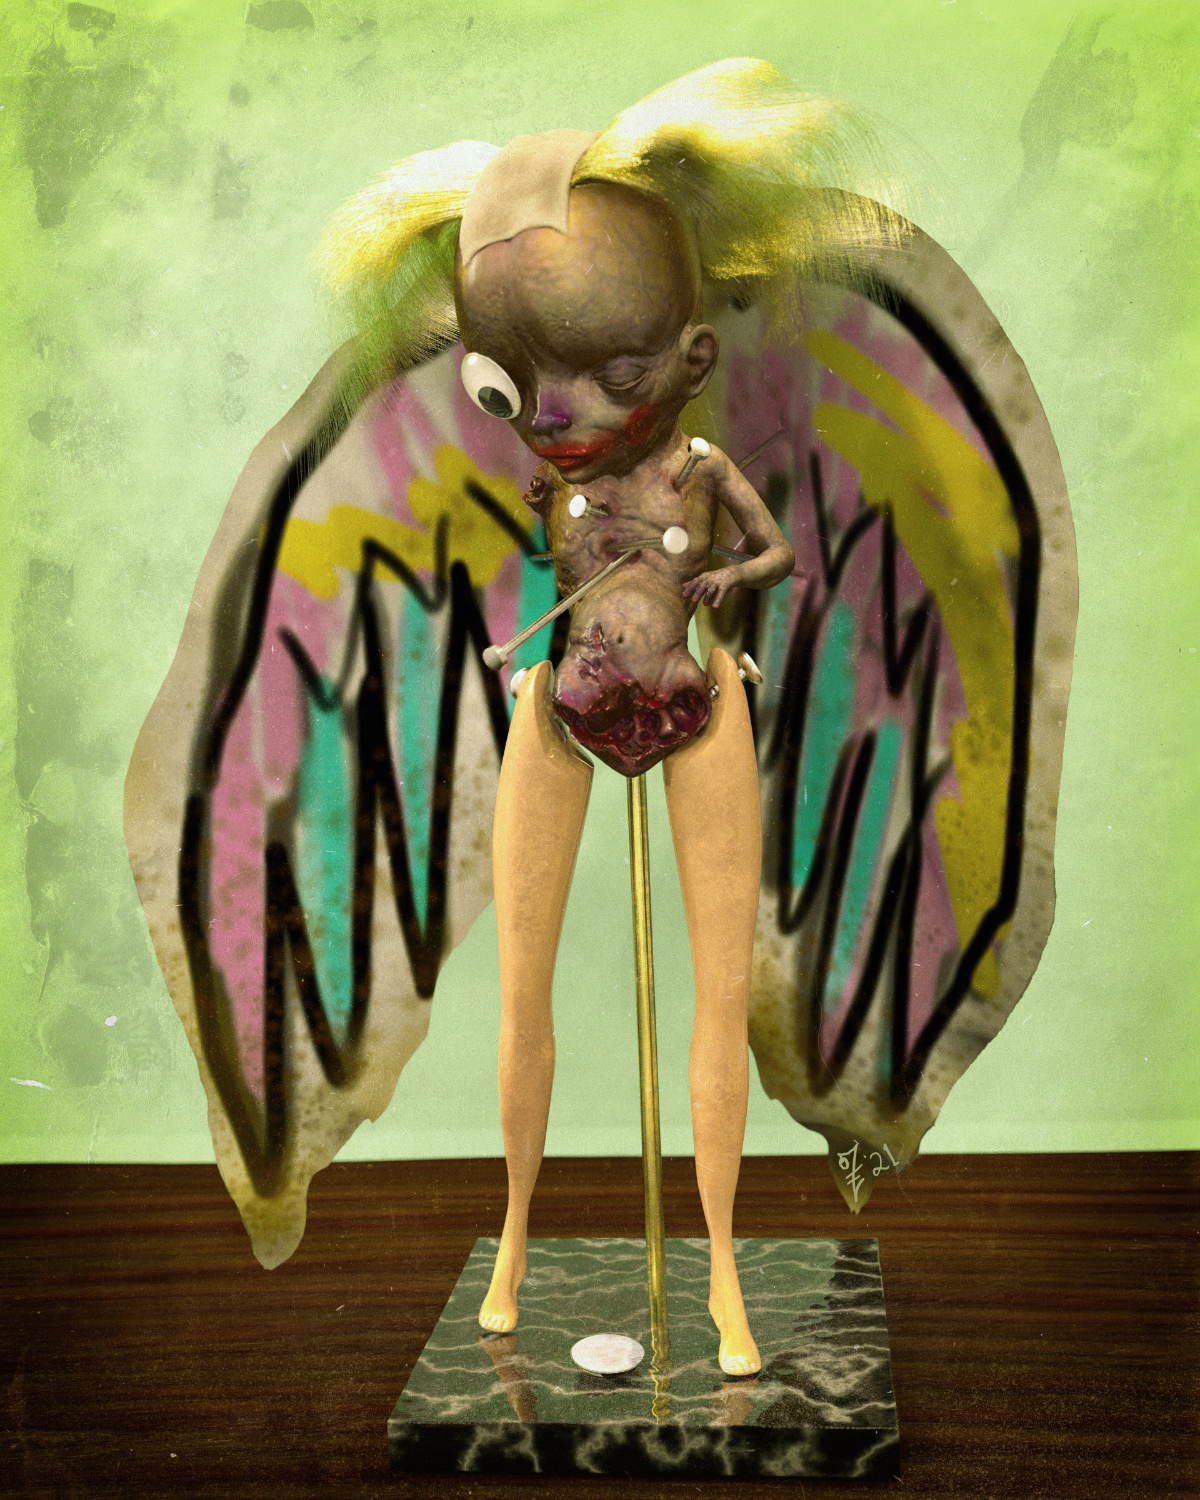
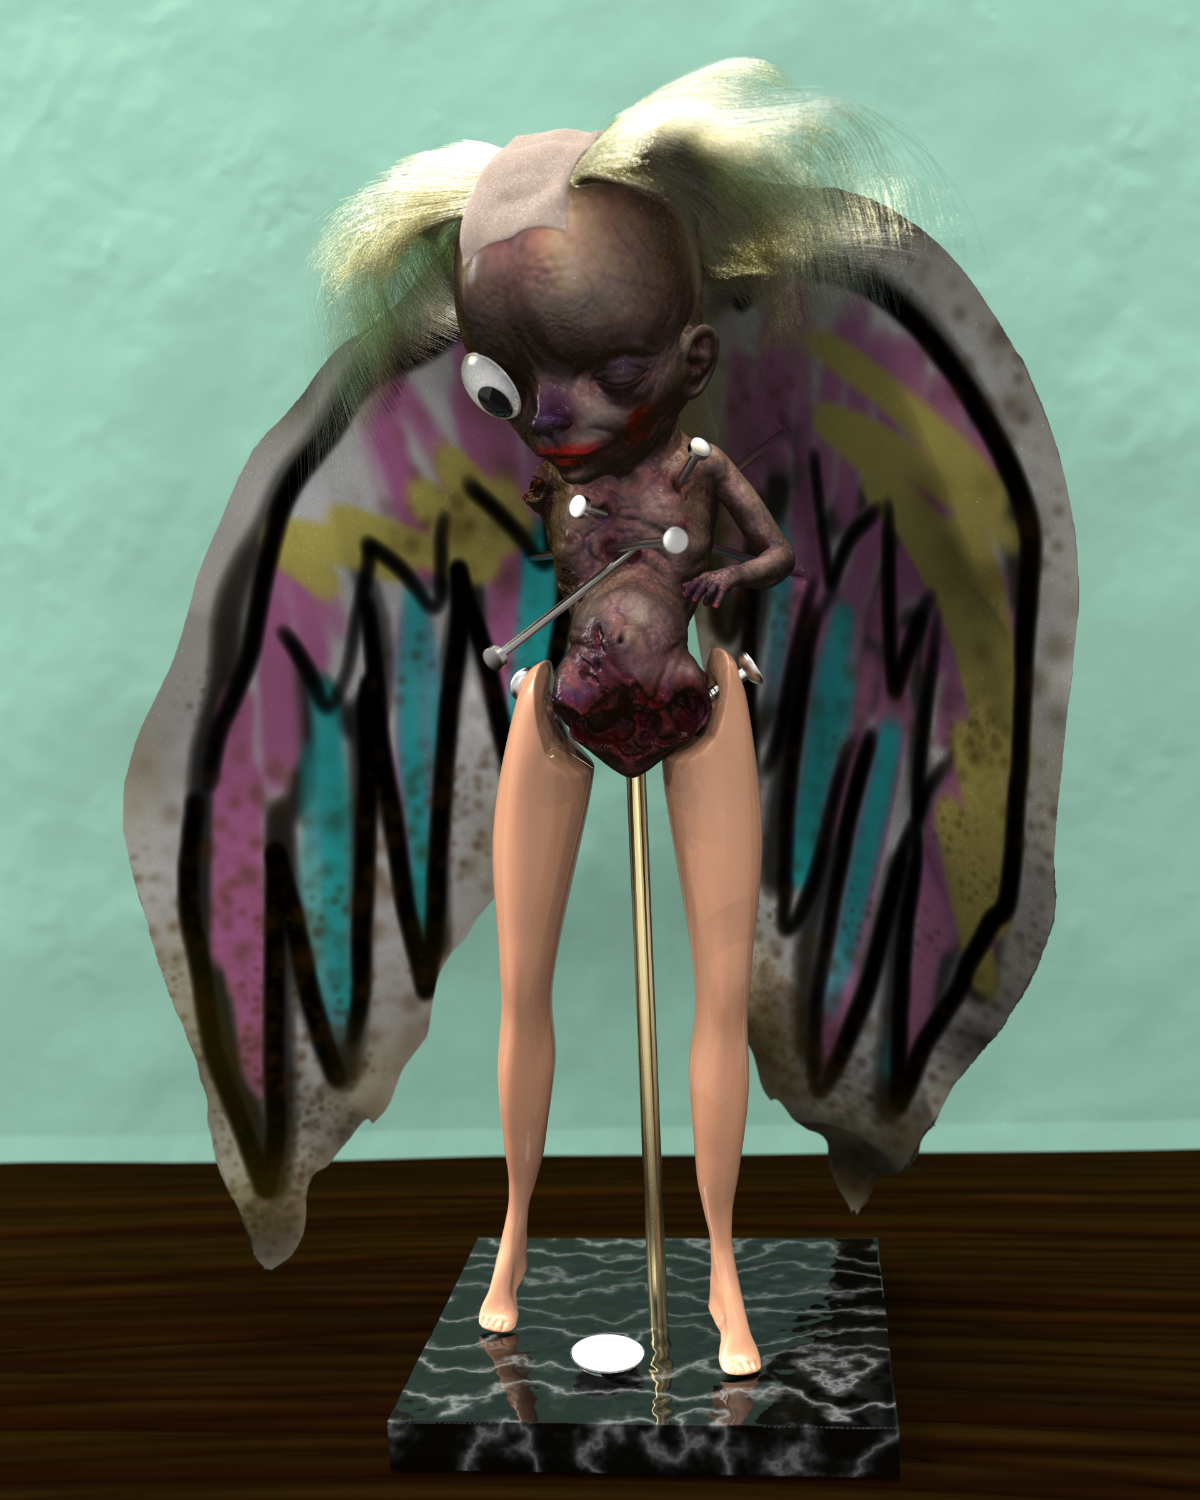
Why hello there! As you can probably tell by the lack of several months between posts, I’ve been keeping way too busy making terrible things! Yes, the juvenile shock-value trend I was thinking I somehow shrugged off is still thriving, and in full force! This will be a semi-long post with many words and pictures, so I’ll cut right to the meat of it and give you the picture before giving you a brief “making of”. That way you can bail early if that isn’t your sort of thing. So, with no further bullshit, heeeeeeeeeeeeeere’s “Dolly”:
Click For Full Size
I guess a brief explanation of this one is in order. It is pretty common for me to form some sort of narrative, at least in the back of my mind, to drive the formation of a particular piece. If I do not start out with a solid narrative, one usually ends up forming before completion. It is also not uncommon for that narrative to change at any point for many reasons, which can radically alter the direction the piece was initially headed in. In this instance, my original idea was to create a cheap 1990s-looking pseudo-advertisement for a children’s’ breakfast cereal called “Embry-Ohs”. It originally was to have a very traditional ad layout for that time-period of an overly happy little girl sitting at the kitchen table wolfing down a bowl full of human embryos. Pretty straightforward, right?
Well, after beginning the sculpture of the first embryo, a different idea that made me laugh to myself even more than the original formed. “Self,” I said to myself, “this little fella needs some googly eyes.” Needless to say, I ended up agreeing with myself. The narrative shifted radically. Now what we have is the doll that belongs to the neglected and ignorant child of a junkie mother and nonexistent father.
Once upon a time, “Uncle Medicineman” came to drop off Mommy’s happy needle juice and disappear into the bedroom with her, just as he did a thousand times before. Only this time, Uncle Medicineman noticed a rapidly growing swelling happening in Mommy’s belly. This time, when he took her into the bedroom, the play screams were different. Uncle Medicineman ran from the bedroom dripping liquid rubies all over the carpet. Rude! The little girl found her mother sleeping on the floor; arms, legs, and belly spread wide open. And laying next to the red Mommy lay a little squishy doll with missing parts. Now, this little girl was creative-a real fucking McGuyver. Using things she found around the trailer: paper, markers, screws, nails, googly eyes, and a fancy receipt holder that used to belong to her Mommy’s Daddy, the little girl could “fix” the squish doll. She even sacrificed the legs of her old favorite doll so that this new one might have a chance. And to top it off, she carefully clipped off a small clump of her mother’s golden hair-careful not to wake her while she spread her halo of liquid rubies into the carpet-and bandaged that hair onto Dolly’s head. All better! Awwwwwwwww!
The End
If you’re still reading this, and have any curiosity about the recent ZBrush/Keyshot/Corel Painter/Affinity Photo workflow I’ve been using, here is a brief explanation:
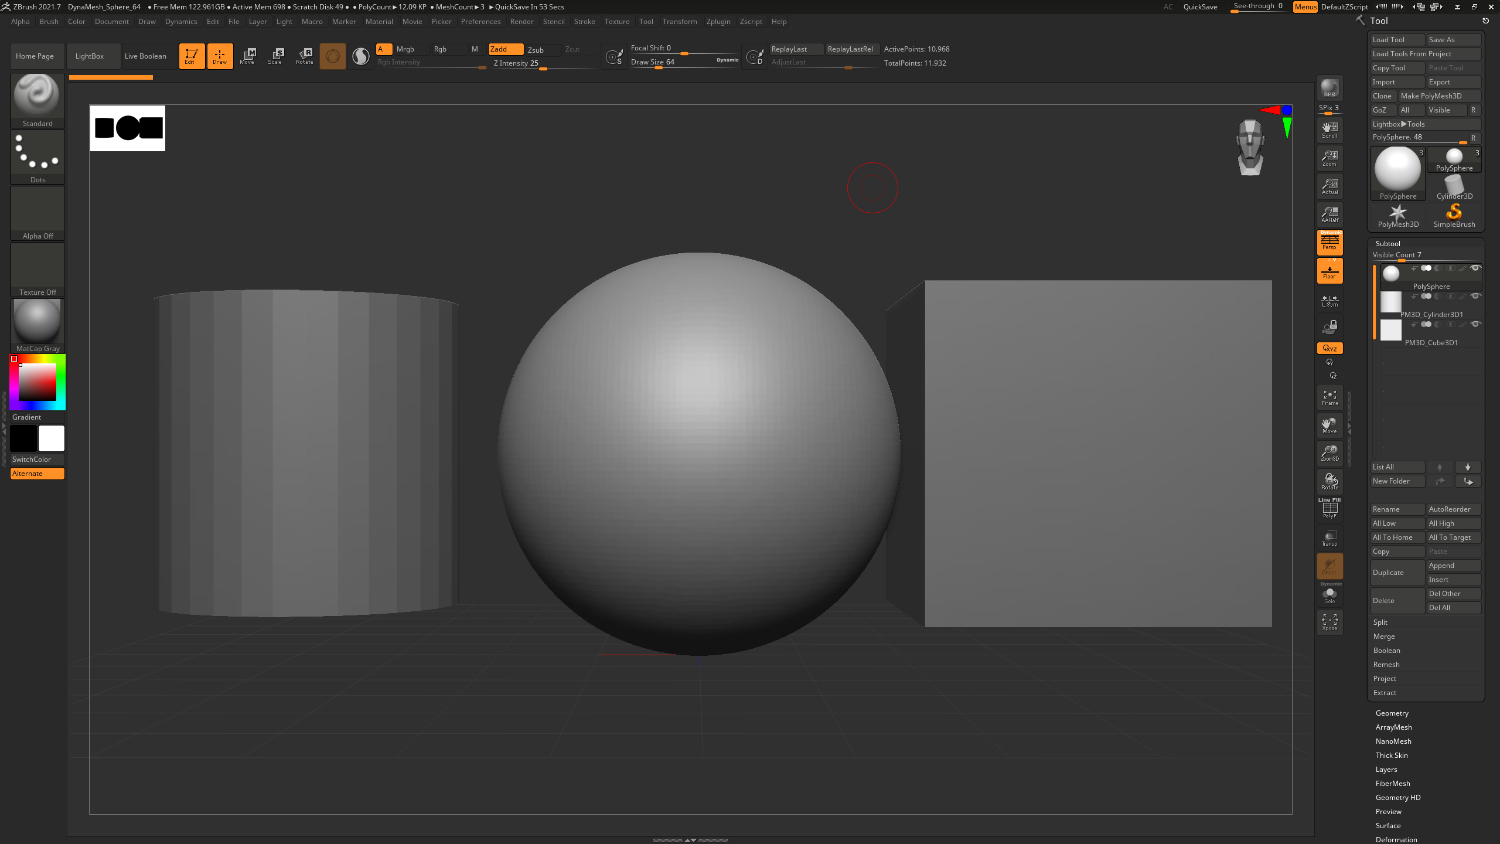
First, I sculpt everything in ZBrush. Generaly, I will try to sculpt all angles of everything, including things I don’t think will be seen. This allows me some freedom when posing things for the final render, and I am not limited to certain angles. I do all the sculpting from scratch, and do not use existing assets. I like for everything I do to be unique, and the sculpting part is my favorite and most meditative step of this process. It is also the most time-consuming step. If I had to estimate, I would say that I spent approximately 25-30 hours over the course of a couple weeks just sculpting everything for this picture. For me, everything starts as a “primitive” in ZBrush, usually a simple sphere. I then stretch, cut, add more spheres, blend, and basically treat the sphere as digital clay until I achieve my desired results. Here is a picture of Zbrush with the 3 primitives I use most often:
Click For Full Size
Here is the completed sculpting in ZBrush:
Click For Full Size
Once the sculpting is complete, I paint anything that will not be a pre-defined, random, or simple texture, still using ZBrush:
Click For Full Size
Once all the painting is complete, I export the file into Keyshot. Inside of Keyshot, I spend several hours setting up lighting, getting the camera nailed down, assign material properties (reflectivity, translucency, depth of field, etc.,) to the parts painted in ZBrush, and assigning colors to the simpler unpainted pieces. In this instance, I also assigned a “Marble” texture for the receipt holder’s base. After about a billion renders and tweaks, I finally settle on one I am semi-happy with.
Click For Full Size
I then export the HUGE png render from Keyshot into Corel Painter. This is where I paint over any blemishes I see, add some more texture, veins, dirt, shit on the nails and screws, a few shadows here and there to help things “pop,” and that sort of thing. I painted over the eye to make it appear open just a crack, and also added a fine layer of dust to help get rid of the too-sterile appearance. I also painted over the wood to make it look more like wood, and added some more variation and highlights to the gore and other random bits. This is also where I first tweak the colors and contrast of the picture. Maybe 6 hours was spent on this step.
Click For Full Size
Finally, I export that png from Painter and bring it into Affinity Photo for the final color and contrast correction. I add some noise to help further add to the realism, and throw a few scummy, dirty, scratched up overlays all over the place to help give it a more scumbaggy appearance. And that, ladies and gentlemen who somehow made it to this point, is how Dolly’s are made!
Well, this isn’t technically a Halloween post, but its most likely the closest I’ll be able to muster up this year. If you want some amazing Halloween posts from a madman who is somehow managing to make one awesome illustration every day this month, go HERE…then come back if you want.
Still in my slump and just not feeling it when it comes to pens, pencils, or brushes lately. A Wacom stylus, however, seems manageable. I recently saved up enough overtime money to pick up the newest full version of ZBrush, AND Keyshot Pro. These weren’t cheap, but they are worth it. To justify my purchase, I decided to actually use them. I’m still a relative noob when it comes to 3d sculpting, and a total noob when it comes to rendering outside of ZBrush, so I figured I should try doing something involving multiple parts, materials, and using an external renderer, and see if I can learn something. On top of that, I was curious how well Corel Painter would mesh with ZBrush to “sweeten” the renders…so I did a quick experiment and whipped this up:
Click Picture for Full Size
In my opinion, it turned out neat enough for what it is – a quick highly stylized sculpt of a generic 80’s rocker. Corel Painter played nice with the render, so I decided to start a “serious project.” I spent a hour here and there for the last few weeks sculpting, painting, rendering, and finally touching the following up in Corel Painter. Thanks to searching google and Youtube for answers every time I got stuck, I did end up learning a lot more about both ZBrush and Keyshot.
Here’s what I got:
Click Picture for Full Size
So I learned quite a bit and was extremely impressed with Keyshot and the types of effects I could get out of it once I began understanding some of the options, particularly with the rendering of glass, fluid, cloth, skin, and metal. It’s probably safe to assume I’ll be back here one day with more. There is something very calming about digital sculpting with headphones on.
Thanks for looking, stay safe, and have a happy Halloween!
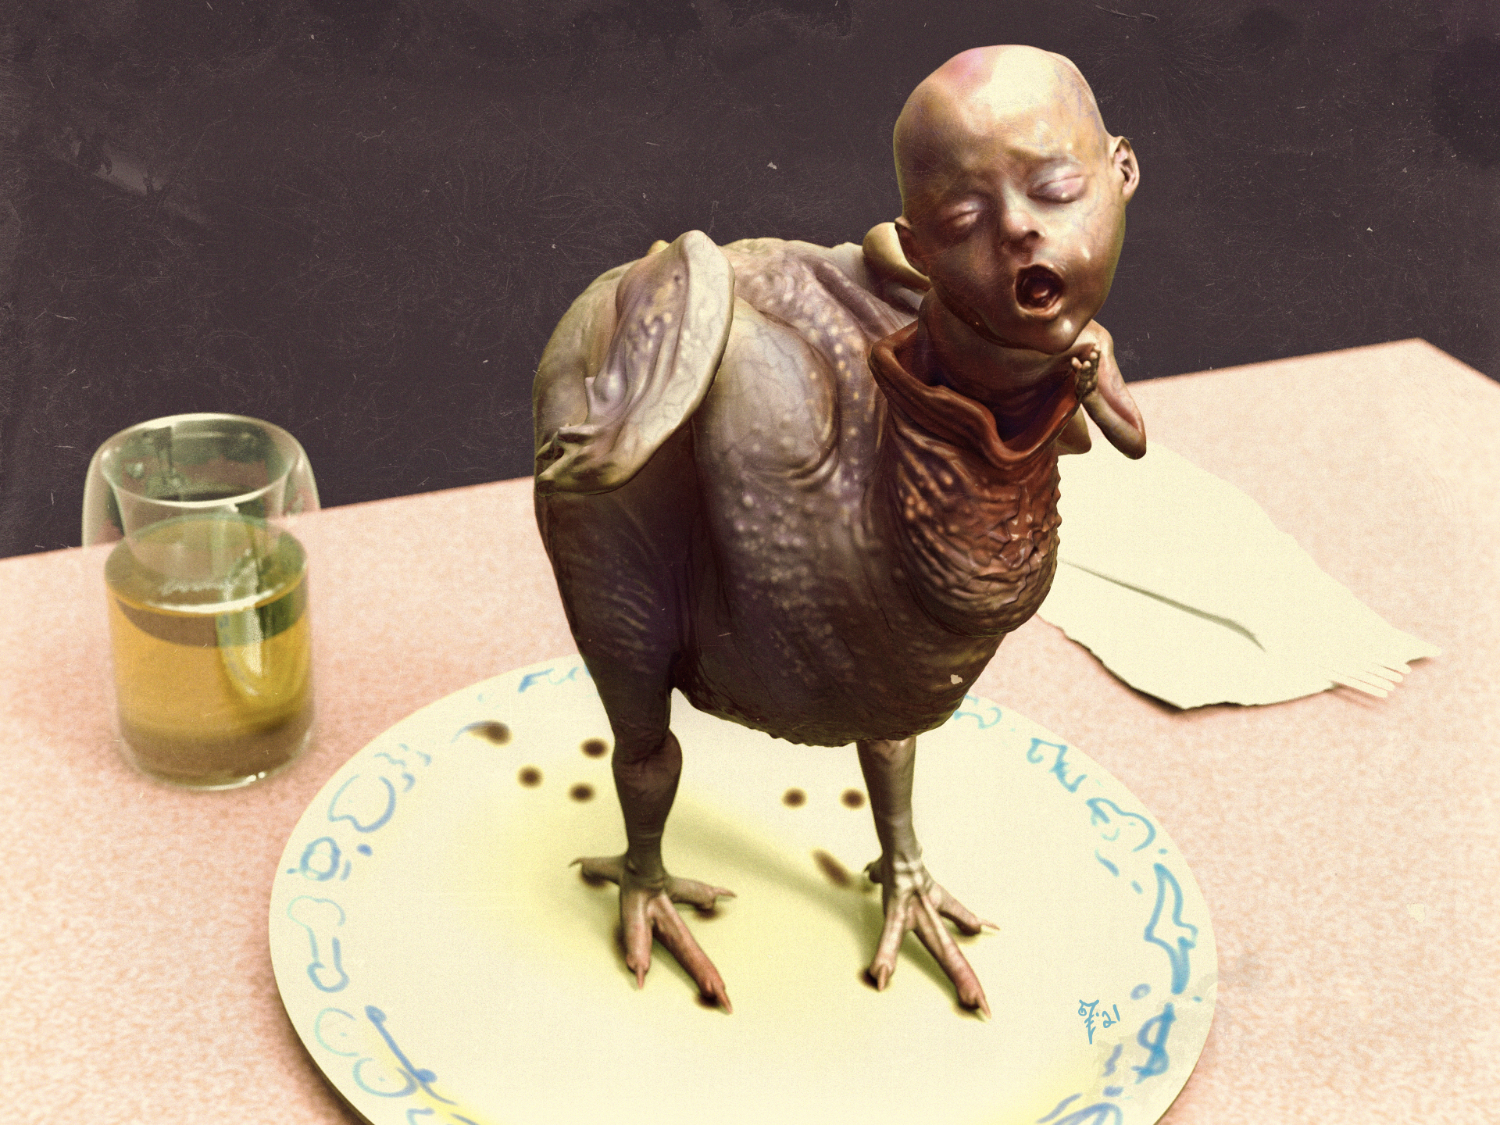
BONUS RE_RENDER:
About a year has passed since doing this one. My knowledge of Keyshot has imporved a bit since then, as has my new workflow with Corel Painter and Affinity Photo. I thought it might be fun to try re-rendering this in my newer style:
So, I got a small 3D resin printer – an Epax X1 for those who care for the details. After fooling around a bit printing other people’s models (mostly small animal skull scans found on Thingiverse) to get used to it, I was finally ready to make this original little bastard:
Click to view full resolution.
This was based on a drawing that my 4 year old niece Quinn (who wants to be an “art” when she grows up) made. She was practicing doing side profiles, and created this ridiculous pointy-nosed and stone-toothed poor little terrified looking guy. I was in awe of this picture and knew that I needed to do something with it when I began to ponder what a slightly more realistic version of it would look like. Here’s her original:
The original drawing of a side profile by my 4 year old niece Quinn that served as the inspiration for my model.
I spent a couple hours a day for several days (thanks forced overtime!!!) re-learning the basics of ZBrush as it has changed radically over the years…and my memory is eroding fast. I then took the resulting 3D model and added the printing supports and did the rest of the preparation in Chitubox. Here are a few shots of the model from a few different angles and a picture of the model with added supports:
Click to view full resolution.
Once the print was done (about 8 hours print time) I cleaned up the model, painted it with acrylic, spray varnished it, and added epoxy to the eyes and teeth to give them some shine.
This was a very fun project that couldn’t have been done without Quinn’s original illustration. The anatomy was a challenge as the lack of any arms or wings really messed with my already limited upper body anatomy. My limited ZBrush knowledge was also improved as I ran into several situations that I needed to find solutions for. Now if I can just continue using these things I learned, I may be able to retain some of them!!!
I do plan on stealing collaborating with Quinn some more in the future, as she is a goddamn maniac “art”. I also plan on using ZBrush more, and maybe make a few more odd little models. But for now, I sleep. Being “essential” blows!
I’m back! After temporarily forgetting how to draw and sculpt due to an ever-increasing work schedule and a Wacom Cintiq Companion suffering from a frustratingly loose charging port, I had a dilemma; what do you give to a published and groundbreaking paleontologist on his birthday that one of your 786 siblings haven’t given him already? Easy! You make him something unique related to what he has a vested interest in and he HAS to like it…or at least convincingly go through the motions of an appeased elder. Read on for a further explanation complete with pictures. Bottom view of the finished euthycarcinoid replica
And now for the reason behind making this sculpture…
My father – Kenneth “Chris” Gass is a paleontologist. Not so long ago while busting up rocks – as paleontologists are known to do – in a local Wisconsin rock quarry known to harbor several different trackways and fossilized bodies of prehistoric arthropods and jellyfish and the like, he became a key part in solving a mystery which had been brewing for over 150 years: what was the first animal to walk on land? As more and more fossil evidence turned up, it became clear that these ancient trackways – the oldest land footprints ever found – were tied to euthycarcinoids. After countless trips to the quarry and surrounding rock formations, tons of collaboration with other experts in the field, and what I can only guess has to be an insane amount of research, he was able to publish a highly insightful and photo-rich book “Solving the Mystery of the First Animals on Land – The Fossils of Blackberry Hill“, published by Siri Scientific Press. Though this might come across as a shameless plug, this book is highly readable and you don’t need to be a tweed-coated Poindexter to appreciate and glean some very interesting information from it. Of all the published books he has written, this is truly his masterpiece. Just go on and buy it here; learn about your creepy looking predecessors!
Anyways, his birthday was coming and I was scrambling for something meaningful to get him. Sure I could have thrown him a few dvds or cds or get something similarly cheesy off the interwebs, but I knew that those things wouldn’t assure me the top slot on his list of greatest offspring ever. I enjoy detailed tangible things, like hyper-realistic sculptures, action figures, and things of that nature – things that I can display and drool over. I assume that some of that trait was passed on to me by him, so that was the first step. The next part seems like a no-brainer in hindsight, but in actuality took me tons of painful brain-straining to come up with; what does he like that I can purchase a tangible representation of? Can you believe that there are not any euthycarcinoid replicas in Walmart’s inventory!? Talk about a missed opportunity for them! I knew that he had to have one of these, but they didn’t exist. With a heavy sigh, and a bit of rustiness, I knew that I would need to get out of my artistic rut and make one. The following describes how…with pictures even!
I started by studying several pictures of actual euthycarcinoid fossil pieces (all can be found in his book), and several illustrations of a variety of different types of euthycarcinoid interpretations found on the internet. My sculpture is based on a composite of all of these sources. First, I used a 2-part plastic putty “Magic-Sculpt’ to create the very thin legs and antennae. I chose Magic-Sculpt for these parts over Sculpey due to the fact that thin pieces are less brittle when finished and have zero chance of burning to ash as Magic-Sculpt is not cooked to harden like Sculpey.
Magic-Sculpt Legs and Antennae for Euthycarcinoid Model
Next, I created a very basic armature using 3 different guages of wire to support the bulk of the model.
Euthycarcinoid wire armature
For the body I chose to use “Super Sculpey Firm” as it dries damn-near solid as stone and has less chance of distorting before being cooked. First I sculpted the top of the body onto the armature and left the underside hollow. I then baked it. A day later I added more Sculpey underneath and sculpted the bottom details. I chose to do it this way rather than sculpting the whole thing first and then baking it, because the middle would have been too thick to safely cook without fear of it cracking or burning the edges too bad. One of the many things I like about Sculpey is how it allows you to add fresh Sculpey onto Sculpey that has already been baked.
Top of Euthycarcinoid sculpture before baking
I then used epoxy to attach the antennae and legs.
Antennae and legs epoxied onto Euthycarcinoid body
Finally I created a base using regular Super Sculpey on a thin slab of wood. I made the base last so I could accurately match the footprints and tail drag-marks to the actual model. Everything was painted using several washes and dry brushing with Basic acrylic paints, then sealed using Miniwax Polyurethane clear semi-gloss spray. The base was painted to the best of my abilities to resemble a rich nutrient saturated mud and crud that these bastards probably fed from. For the creature itself I chose to go with a color-scheme that resembles a horseshoe crab. Rather than go too fancy and risk things looking too Fisher-Pricey, I decided to add some additional faint yellow mottling purely for aesthetic reasons. Fact is, these little bastards could have been covered in neon-green and hot-pink feathers for all I know…
Finished Euthycarcinoid Replica on Base
So that’s the gift, and here was my first post in a gazillion and six years. I have been working way too much overtime and have been in a disgusting artistic rut, but fear not. Thanks to all of that overtime I have been able to save up enough for a new Wacom Cintiq 22hd. With that disgustingly huge investment and this last project which gave my creativity drive a pretty good kickstart, I will be back. Thanks to those who still check up on this “art” blog!
Welcome to iDrawCrap! Thank you for clicking on whatever you clicked on to get you here! My name is Todd Gass and I am a nobody who likes to pretend I can draw paint and sculpt things that someone else might find interesting. As is true with many people who claim to be artists, lack of motivation and procrastination are very real and very destructive entities. This blog is my attempt to fight back. I’m hoping that by doing this blog I can convince myself that there are people expecting something from me, and in turn, I can be more productive.
A HUGE thanks goes out to my coworker and friend John D who planted this whole blog seed in my head. He makes my crap look even crappier. Check his stuff out: Mostly Arty Somewhat Farty or Comic Book blogs.
This first post is going to contain some categorized samples of my earlier crap that I haven’t lost or destroyed yet. I am horrible with time and record keeping, so I’m not even going to try to guess how far back some of these go.
A quick word of warning: there will be plenty of foul words going forward as well as adult content, so please hit that back button now if you are easily offended!!!
ZBRUSH
“Baby Mesh Head” – An early Zbrush piece I am sort of proud of.